Spectacular light and a unique subject alone don't make a great photo. A good composition that ties the two together is also required. In this article, I give you six tips on improving your photo compositions and dealing with different light and subject matter.
I present the tips below in no particular order. There's not one tip that's more important than the others. View them as a selection of techniques you can apply in different situations.
Pay Attention to Your Middle Ground
I love my wide angle lens. It's the most cliché landscape photography lens, but I don't care. It can be used to get low to the ground and close to any foreground element, and the distortion it creates can draw the viewer into the scene.
While doing so, don't just focus on the foreground, though. In the photo below, you can see coastal flowers on the left side of the frame. Those are very characteristic of the Cornish coast. But I refrained from getting lower with my camera to get closer to them. The reason for that is the middle ground.
When you compose your photos, you should always pay attention to it. If you set up your camera too low, elements in the middle ground occupy less space, or they vanish completely behind objects closer to the camera. This is not always bad, and you can use it to hide things you don't want the viewer to see. But you will also lose depth.
In the example photo, I wanted to keep a separation between the rocks in the foreground and the sea stacks on the left side. This way, the rocks and sea stacks appear as repeating shapes throughout the image. I also wanted to allow the viewer to see where the path leads. The green slopes on the right side would have been lost had I moved closer to the ground with my camera.

Find a Proper Foreground
I try to create balance in my photos. It entails finding foregrounds that harmonize with the different skies I encounter. A clear sky, for example, doesn't blend well with a chaotic foreground. If you don't have any clouds in the sky, try to find a clean foreground instead.
In the photo below, I use a flat meadow as foreground. It works well with the clear, magenta sky because of its yellow-green color and the little pools that reflect the colors of the sky. With a clear sky, less is more in terms of foreground.

If you happen to have clouds in the sky as I had at Land's End in Cornwall a few years ago, it's different. Try to find a foreground containing structures and shapes that mimic what you see in the sky.
The diagonal orientation of the high clouds above Lands End is picked up nicely by the shapes of the rocks in the foreground. You can also find some of the colors of the sky in the foreground. It helps to tie the photo together.

Use Leading Lines
Leading lines come in different shapes and forms, and it might take some practice to find them. If you walk around and look at the landscape from eye level, you'll often miss them. That's why you should get out your camera and move around during scouting: get low, head to the right and to the left, and explore all angles you can find.
To craft dynamic compositions, look for diagonals you can use as leading lines. If you find curving lines, that's even better. And be careful with the placement of those lines: you want leading lines that point into the photo towards your main subject. Avoid those that draw the viewer out of the frame.
In the example photo, I use a mix of leading lines. I got very low to capture the backflow of water, which created lines coming in from the bottom left of the frame. As the water was flowing around the rock in the center, it created a curving leading line. It enters the image from the bottom right and bends towards the sea stacks in the background.

Use Layers
Layers can be a powerful way to structure your images and bring order to your compositions. Especially when I take photos with a long lens, I pay close attention to how the elements in my photo stack up. Once I identify different layers, I try to align them in a rhythmic way that makes it easy for the viewer's gaze to wander through the frame.
Here, it helps if you can achieve a composition where the intersecting lines between the layers are at an angle. It makes the photo more dynamic. Think of those intersections as leading lines: diagonals and curves work very well.
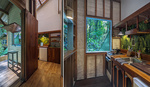
In the photo of the rice terraces in Vietnam, you'll notice three main layers: the rice paddies in the foreground close to the camera, the rice terraces in the center, and the hill in the background, which accommodates even more rice paddies. The different size of those terraces creates a great sense of depth in the photo. The intersecting lines are at an angle while the paddies curve through the picture.

Use the Rule of Thirds to Your Advantage
When I compose my photos, I often start with the rule of thirds. As I wrote above, I strive to create balance in my images, and this rule gives me a good foundation. But strictly applying it would be limiting. Once I get a rough alignment of the important elements in the frame by using the 3x3 grid in the live view of my Canon R5, I start to shift it around. Now, I go solely by what my eyes tell me looks pleasing.
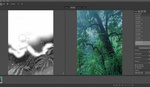
Sometimes, the end result follows the rule of thirds, but often, the elements are aligned differently and no longer obey any particular rule. In the woodland photo, the trees on the left and the light on the right are balanced. This balance was not achieved by placing them exactly on the vertical lines of the 3x3 grid.
I started the composition that way but then moved the camera until the distribution of visual weight in the photo felt balanced. Since the trees on the left have a strong visual weight, I had to move them closer to the center of the frame while having the soft light source on the right sit closer to the edge. Think of a pair of scales: to balance a heavy object with a lighter one, you must move the heavy object closer to the middle and the lighter one farther out.
You can apply the same principle to balance elements of different visual weights in a photo. But as with using scales, you have to start somewhere, and this is where you can use the rule of thirds to your advantage.

Give Your Subject(s) Space
Before you start composing your photos, find your main subject. It can be a single element, or you can have multiple important subjects. Once you've identified those, try to give them space in your composition. You don't want to have them merge with other elements in front of or behind them. Create contrast between them and their surroundings and give them the visual weight they deserve.
In the example photo, I'm standing on a ridge looking down the coastal mountains of central Crete. I made sure to put my camera high enough to create good separation between my head and the mountain ridge in the center of the frame. The light helps to separate me from the landscape. The mountain in front of me is in shade and provides the perfect backdrop.
Whenever you want to emphasize your main subject, do so by properly positioning your camera and working with the light in the scene. Often, it just means moving your camera a few inches to the left or right, top or bottom. But occasionally you might have to climb a mountain to get your camera high enough. In the feature video, I talk more about the different composition techniques and give you additional examples in the field.

Conclusion
I need to mention something very important: Although the text above sounds like a selection of compositional rules, don't treat it that way. See it as a choice of compositional techniques that will help you create good compositions in many situations. But ultimately, go by what your eyes tell you and what looks good to you. I talk a lot about balance, but maybe you don't want a balanced photo and want to create tension between the elements in the frame. That's perfectly fine. You might then want to compose your images differently from the examples I show above.
But whatever your preferences are, it's always good to learn about the rules and techniques other photographers apply. Then simply pick the ones that suit your specific needs.


Thanks for the reminder of basic things! Too often they slip through....
These images are STUNNING!!!