Have you always admired the photos of beautiful water droplets and wondered how the photographer managed to capture the moment? While you see high-quality water drop photos all over the internet, getting such clear images takes patience and experimentation.
Are you interested in learning how to take amazing macro water droplet photos? You are in the right place.
How to Take Gorgeous Macro Water Droplet Photos
Macro photos are super fun because you get to see things that are often invisible to the naked eye. But macro photography can be a seasonal pursuit. We tend to find macro subjects like bugs and critters mostly in summer. You may see fewer natural macro subjects during the off seasons, like fall and winter.
Water droplet photography is an excellent option if you're a macro enthusiast trying to find an exciting subject for your next project. And it is not that hard; we will guide you step-by-step.
1. Things You Need for Taking Water Droplet Photos

Here are the things you need to get started. This is a general guideline—you can experiment and improvise the setup with experience.
- Shallow bowl filled to the brim with plain or colored water
- DSLR or mirrorless camera with a macro lens
- Tripod or a sturdy place to put your camera
- Wired or remote shutter release for your camera
- Speedlight with a diffuser
- Medicine dropper or syringe
- Mat or small rug to place your bowl on
- Rag for cleanup
2. Prepare the Setup

Put the bowl on a sturdy table and position your camera to look at the brim. If you have a tripod, it can be handy. If not, you can use a stack of books like how we did. Remember to connect the shutter release to your camera before you start. Once you have your setup ready, it is better not to touch it.
We will shoot at a fast shutter speed in burst mode. You don't want the camera to search for focus with every shot, so keeping your lens in manual focus mode is essential. So, we must carefully select the focus point where we want the lens to focus—a particular area where the drops are likely to fall.
To do this, place an object like a ruler or knife on the bowl's brim, change your lens to manual focus, and focus on the ruler's edge. Then, remove the ruler. Be careful not to disturb the setup while doing this.
3. Place the Lights

We are using a speedlight in our example. We are also using it off the camera to light the water drops better. You can also use multiple speedlights for different looks.
Depending on your camera and the speedlight models, you may need a remote flash trigger to light up the speedlight. You can also use continuous lights if you have them.
You can try this in daylight without any artificial lights, but your shutter speed must be high, in the 1000s. So, you should be near a bright window and get diffused sunlight with sheer curtains.
We highly recommend using artificial lights as they give you the creative flexibility to try different effects, locations, and times of the day.
4. Camera Settings

We are using a macro lens, and if you have used one in the past, you probably know how shallow the depth of field is. So it's a good idea to use an aperture above f/8 if you're using a macro lens. If you're new to macro photography, see this list of equipment for taking professional macro photos.
Since we are using a speedlight, our shutter speed will be the flash sync speed, 1/250th of a second. Again, because of the artificial lights, we have the luxury of using a low ISO, like 100.
Place your camera in burst mode to get continuous shots. This way, you will get as many photos of the water drops as possible.
Also, choose the image quality as RAW. There are many advantages of shooting in RAW. For example, you have the flexibility to pull details from underexposed and overexposed areas and tweak the white balance if needed.
5. Take the Water Droplet Photos

After placing the lights, tweaking your camera settings, and focusing on the right point, it's time to start shooting.
Start by filling some water in your dropper or syringe. You can have another person use the dropper and help you. But, it is totally doable by yourself. Use one hand to pour the water and another to click the shutter release.
First, take some test shots and see if you're happy with the lighting and exposure. If not, adjust the position of the lights and your camera settings.
You don't have much control over where the drops fall. Most of the time, they will fall out of your lens' focal point. That's perfectly fine. Remember, you're shooting in burst mode for this reason. So, take as many photos as you can.
6. Don't Get Frustrated

For every good photo, you will have hundreds of out-of-focus, blurry, and unusable shots. To avoid frustration, don't be tempted to stop and check often. Instead, take about 500 shots before stopping.
To check the photos, remove the memory card from the camera without disturbing the setup. If you're unhappy with the pictures, you can continue taking more photos if you leave the setup as is.
7. Edit Your Photos

You may have thousands of images, but only a handful will be usable. So check all the photos thoroughly—zoom in to 100% and check for clarity. If you're using Lightroom, see our guide to converting from RAW to JPEG in Lightroom.
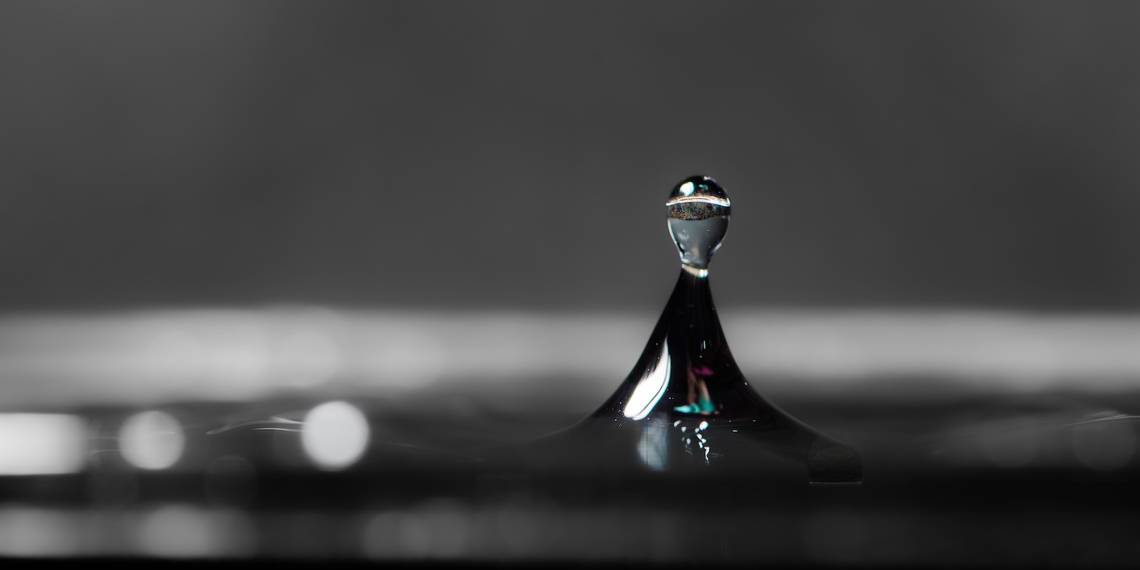
In our examples, we have used the selective coloring technique to leave the reflections on the water drops in color while changing the background to black and white.
You can edit your photos in any way according to your creative vision, but don't skip the editing part. At the least, play around with highlights, shadows, vibrance, and saturation to make your photos come alive.
Water Droplet Photography Is the Perfect Project for Photography Enthusiasts
As we have said many times before, take different types of photos to understand your camera better and become a confident photographer. Water drop photography is an ideal project to try and stretch your creative muscles when you're stuck inside.