Heading out the door? Read this article on the new Outside+ app available now on iOS devices for members! Download the app.
If you’ve ever experienced sciatica, you know that the nagging, painful sensations in your lower back and legs affect literally everything you do—the way you walk, how well you sleep, and whether you can pick up your child or manage a short road trip. The pain can be unbearable.
When all you want to do is get rid of the pain, you can practice yoga for sciatica relief. Sciatica stretches can provide a temporary reprieve from symptoms as well as help ease discomfort over the long term. Not only can your yoga practice help relieve your symptoms, but research suggests it can also improve your mental outlook as you cope with chronic pain.
What Is Sciatica, Exactly?
Sciatica is the name given to the irritation of your sciatic nerves, which start at the base of your spine and extend through the pelvis and along the backs of both thighs. Sciatica is quite common. As many as 40 percent of people will experience it in their lifetime.
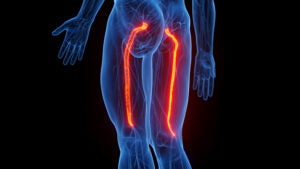
“Sciatica is actually a symptom, it’s not really a cause,” mobility coach Dana Santas explained to CNN Health. “So we have to figure out: What is the cause of your pain?”
The muscles in your low back, hips, and glutes surround your sciatic nerves. These muscles, according to Santas, “compress the sciatic nerve and [can] cause that nerve pain.” For instance, the piriformis is a muscle near the hip joint that “tends to be the biggest aggravator of the sciatic nerve,” she says.
Different physical injuries can cause pain in the sciatic nerve, such as a bulging or herniated disk in the spine, an overgrowth of bone (also known as a bone spur), or an injury to the lumbar spine.
As you age, you may be more susceptible to the condition, although it’s most common in people between the ages of 30 and 50. Your occupation is another risk factor—prolonged sitting can cause sciatica over time, as can a job that requires heavy lifting. Excess body weight may also contribute to sciatica; some develop sciatica during pregnancy. It’s important to consult with a physician if you are experiencing sciatica pain.
Symptoms of Sciatica
Those who have sciatica are familiar with some or all of the following sensations that occur in the low back, hips, and legs:
- Achiness
- Burning sensation
- Muscle weakness
- Numbness
- Sharp pain
- Throbbing or tingling sensations (aka “pins and needles”)
Sitting, bending forward, twisting, or trying to stand up can all make sciatic pain feel more intense. Although the sciatic nerves run along both legs, it’s common to experience sciatic pain on only one side of the body.
5 Sciatica Stretches to Help Relieve Nerve Pain
The following sciatica stretches can help release physical tension in the muscles of your low back, hips, and glutes and may help soothe sciatic nerve pain. Go slowly and if your pain intensifies, come out of the pose and try a different one.
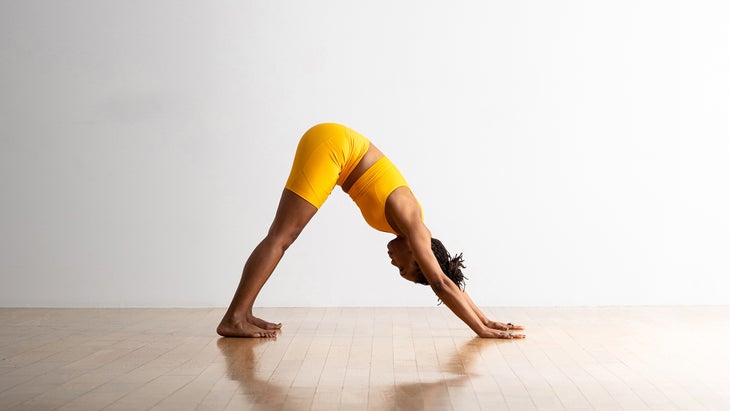
1. Downward-Facing Dog Pose (Adho Mukha Svanasana)
Sitting, standing, and moving around can cause compression in the low back and trigger your sciatica pain. Downward Dog takes the pressure off your lumbar spine, which creates more space in between the vertebrae. Even several breaths in Down Dog can bring relief to your low back.
How to:
- Come onto your hands and knees with your hands slightly in front of your shoulders.
- Spread your fingers, push down through your knuckles, and tuck your toes.
- On an exhalation, lift your knees and reach your tailbone toward the ceiling. Press into your palms and feet as you lengthen your back.
- Reach the backs of your legs toward the wall behind you. Keep your knees slightly bent. (For a milder stretch, bend your knees more.) Relax your neck and let your head hang. Take 10 breaths. To come out of Downward Dog, exhale and lower yourself into Child’s Pose.
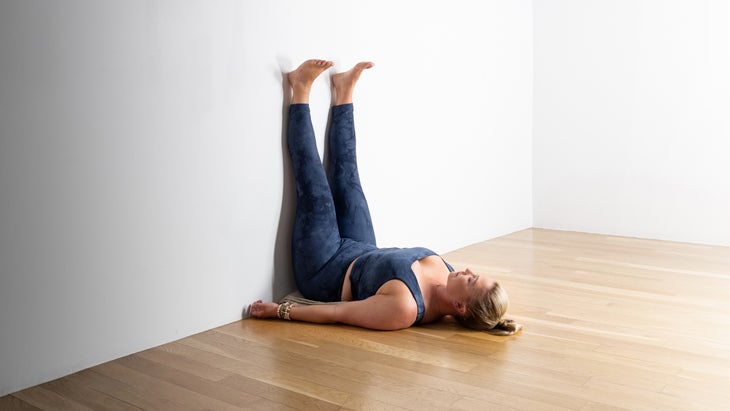
2. Legs Up the Wall Pose (Viparita Karina)
People with sciatica know that sciatic pain can travel from the low back through the glutes and down the hamstrings. This pose can offer relief by stretching your hamstrings and glutes, relaxing your hips, and releasing tension in your lower back. Legs Up the Wall also offers the benefits of an inversion, such as improved circulation and relaxation.
How to:
- Come to a seated position on the floor with one hip alongside a wall. Lower down onto your back as you lift your legs and feet and rest them against the wall. Keep your feet about hip-width apart. Shift your tailbone as close to the wall as you can, but it doesn’t need to touch. Let all the weight of your lower body rest against the wall.
- Relax your arms on either side of your body with your palms facing up. Release the muscles of your upper body. Imagine you’re sinking into the floor.
- Rest in this pose for 10 minutes or as long as it’s comfortable. To release, bend your knees and roll to one side. Pause for a few breaths before pressing into your hands to return to seated.
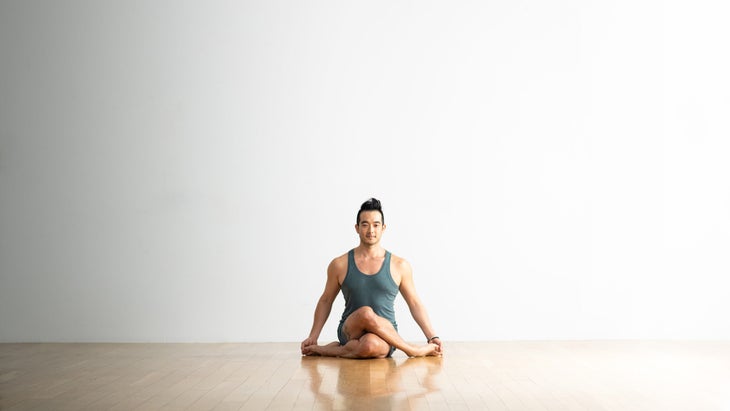
3. Cow Face Pose (Gomukhasana), Variation
This variation of Cow Face Pose offers a strong stretch for the hips as well the piriformis. Stretching the piriformis muscle helps ease compression on your low back and hips, which can cause sciatic nerve pain. Perform Cow Face Pose on the right and left sides; though Santas advises to focus on the side where you’re feeling sciatic nerve pain.
- Come into a seated position with your legs straight in front of you. Cross your right leg over your left leg, bend your knee, and try to stack your knees, bringing your right foot to the outside of your left leg or as far toward your left leg as you can.
- Bend your left knee and bring your left foot to the outside of your right hip. It’s okay if they don’t line up exactly.
- Lengthen your spine and lift out of your lower back.
- Stay here for 5 slow breaths. Repeat on the other side.
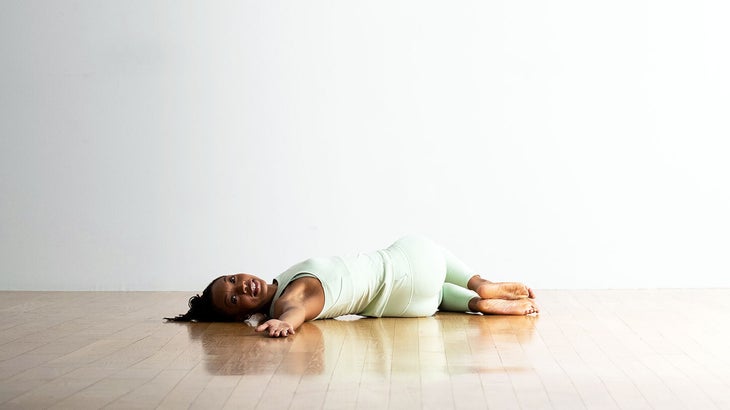
4. Supine Spinal Twist (Supta Matsyendrasana)
This pose provides a passive stretch for your spine and hips by letting gravity pull on your knees to relieve sciatic nerve pain. If you spend long days sitting at a desk, a Supine Spinal Twist can release some of that built-up tension in the back and hips.
How to:
- Lie on your back, bend your knees, and draw them toward your chest. Move both knees toward the right and let them release toward the floor. If the floor feels too far away, place a rolled-up blanket or yoga block under your bottom leg. For a gentler twist, keep your legs toward the right side and keep your upper body flat on the floor, with your arms resting on your stomach or alongside your body. For a deeper stretch, twist your upper body to the left side and extend your left arm toward the left side as well. For an even deeper twist, turn your head to the left side and gaze over your left arm.
- Stay here for 5 to 10 breaths. To release, bring your gaze and upper body back to neutral. Bring your legs back to your chest and rest your feet on the floor. Pause here. Repeat on the other side.
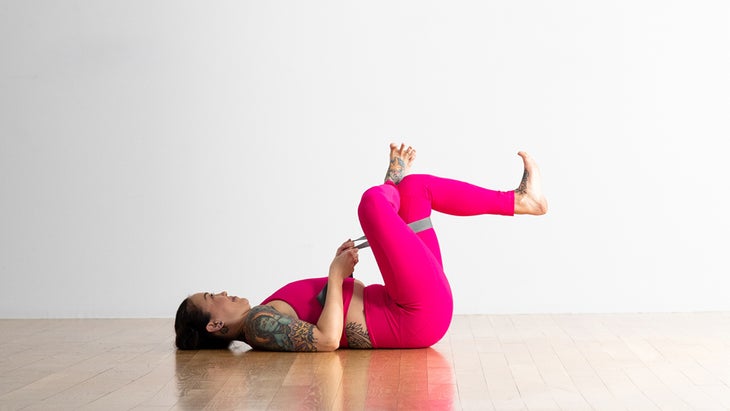
5. Reclining Pigeon Pose (Supta Kapotasana)
Sometimes called a Figure Four stretch, Reclining Pigeon Pose stretches the outer hips while releasing pressure on the low back. By lying on your back instead of doing a traditional Pigeon Pose on your front side, you experience less pressure on the hips. This version also makes it easier to modulate the intensity of the stretch.
“If you find that you feel pain when you do this, the stretch isn’t for you,” Santas says. “But if you find relief when you’re doing it, then hold it for your five breaths.” She also suggests that you place a pillow or blanket underneath your head if it’s uncomfortable to rest your head on the floor. You can practice a modified Pigeon Pose in a chair if that feels more accessible than coming to the floor.
How to:
- Lie on your back with your knees bent and feet flat on the floor.
- Cross your right ankle over your left thigh. Interlace your fingers (or use a strap, belt, or long-sleeved shirt) behind your left thigh and pull your leg close to your body so your left foot is off the floor and your left calf is parallel to the floor. Flex both feet. Find a comfortable position. The closer you pull your left leg, the more intense the stretch in your right hip.
- Stay in this position for 5 breaths. To release, gently let go of your left thigh and lower your feet back to the floor. Pause here and let your low back release and relax. Repeat on the other side.
This article has been updated. Originally published July 2, 2021.