- Where Is the Best Place for My Custom Styles in Ionic 1?
- How Do I Override Color Variables Correctly in Ionic 1?
- I’m Missing Some Ionic Icon Fonts!
- Setting up Icons That’ll Display Differently between iOS and Android in Ionic 1
- Keeping Custom Header Elements in Line on iOS
- Conclusion
- References
- Frequently Asked Questions on Ionic App Development
Ionic is an incredibly useful framework for building HTML5 hybrid mobile apps. It is a great starting point for creating Cordova/Phonegap mobile applications. It provides common mobile app components that are reusable and adaptable. Ionic also provides a very useful CLI (command line interface) that allows you to create, compile, run and export mobile apps with ease. It is continuously adding new features pushing it beyond just a front end framework. Need to put together a prototype before building a native app or responsive web app? Ionic is a great choice for prototypes too.
In this article, I wanted to provide an overview of some of the most useful things I uncovered. I hope that it helps new developers get their own apps up and running faster.
These guides will assume you’ve got a project up and running in your CLI. We will use one of the templates found on the Ionic “Getting Started” page. For example, ionic start myApp blank. This is definitely the best way if you’re starting from scratch. You’ll get access to all of the Ionic CLI features along with their core starting template.
I’ll start with something almost every app will want to do – customization.
Where Is the Best Place for My Custom Styles in Ionic 1?
I’ve played around with a few ideas within the project structure looking for the best method. One that would be clean for my own expanding projects but would also work with the ionic Gulp set up. I didn’t want to change the default Ionic Gulp file unnecessarily.
Just Put Styles in www?
It may be tempting to rush into things and throw new scss files into the www folder somewhere. Near the code for the Ionic styles and then add a reference to your CSS file within the index.html. Avoid that! It doesn’t work so well with the Ionic Gulp set up. Better not to add things in there.
A Better Way – Adding Styles into ionic.app.scss
In the folder called /scss, you should find an ionic.app.scss file. This is the main SASS file that compiles all the styles for your app. This is what Ionic’s Gulp set up will refer to. Want your code to work and compile with everything else, including live refresh? The ionic.app.scss file is self-explanatory. You can add plenty of new styles at the end of this file. This will work well for small and simple apps with a few customizations.
One Step Further – Put Your Custom App Styles into Their Own Folder
Chances are, your app isn’t going to stay small and simple. It is going to grow and you are going to want it to remain manageable. This is especially true if a team of developers is involved (either now or in the future). For these reasons and more, I’d recommend splitting your custom styles into a neater set of files. The files should mirror Ionic’s sass files whenever we’re specifically overriding Ionic itself. Put these custom app styles into their own subfolder.
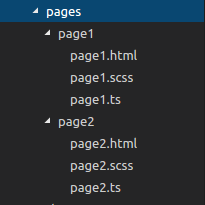
I set up a folder which matches the app’s name within the scss folder. The main scss file for my custom styles matches that app name too. For example, for a social networking app for ants with the name Antstagram would have its styles in scss/antstagram/antstagram.scss. Within antstagram.scss, we’d then have several @import statements to import our other scss files like _variables.scss and _items.scss. This is done for those matching our Ionic framework. It is also done along with custom files specific to our app functionality like _antmountain.scss. Speaking of _variables.scss, there are a few ways to override Ionic’s variables. I’ll explain those in my next tip.
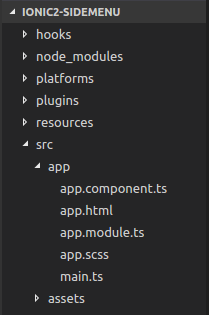
Best Place for Custom Styles in Ionic 2
In ionic 2, the default folder structure places each component with its own SCSS file. This is where you should put all page specific styles.
Custom styles that apply globally should go in the app.scss file located in src/app/app.scss
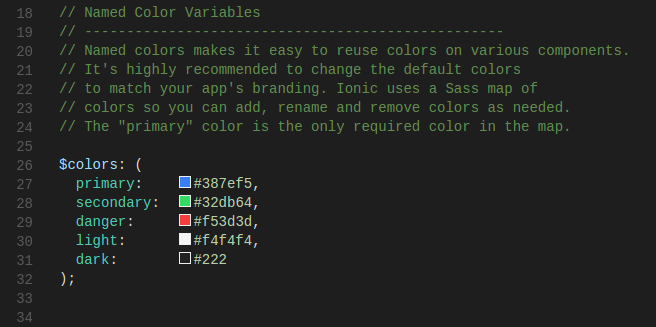
To customize the overall theme of your app, edit the src/theme/variables.scss file. This is where all the color variables are declared. The $primary color is the only required color. It is the default color used to style the buttons and other components in Ionic 2. A good approach is to set the color variables to the colors of your design. This should be done instead of declaring custom classes whenever possible. This ensures that the colors are applied consistently throughout your app. Do note, that the $colors map should only contain variables for UI components. Arbitrary color variables should not be placed here.
How Do I Override Color Variables Correctly in Ionic 1?
Ionic comes set up with a set of styles pre-defined and ready for you to customize and use. Before defining a ton of your own variables, have a look through the list of default variables first. Use them if they’re applicable to what you’re looking to style.
These variables are all conveniently listed in www/lib/ionic/scss/_variables.scss. It is tempting for beginners to edit them here. Don’t do it! Whenever you update Ionic, your changes will be overwritten by any updates to Ionic’s variables. Generally – don’t customize anything in the www/lib folder. Leave those files as is. Pretend those files are completely read-only. You can add to them if you’ve got another JavaScript library you’d like to use. Otherwise, you’ll want to avoid customizing files in here.
In your initial project set up, you should already have the scss/ionic.app.scss we mentioned earlier. It contains guidance on where to put variable overrides. I’ll add to their method – I prefer to have variables in a separate scss file. scss/ionic.app.scss looks like this by default:
/*
To customize the look and feel of Ionic, you can override the variables
in ionic's _variables.scss file.

For example, you might change some of the default colors:

$light:                           #fff !default;
$stable:                          #f8f8f8 !default;
$positive:                        #387ef5 !default;
$calm:                            #11c1f3 !default;
$balanced:                        #33cd5f !default;
$energized:                       #ffc900 !default;
$assertive:                       #ef473a !default;
$royal:                           #886aea !default;
$dark:                            #444 !default;
*/

// The path for our ionicons font files, relative to the built CSS in www/css
$ionicons-font-path: "../lib/ionic/fonts" !default;

// Include all of Ionic
@import "www/lib/ionic/scss/ionic";
So, why not just redeclare variables at the end of ionic.app.scss? Why are they all at the start of the file? The reason for this is that they need to be added before the ionic import. Otherwise, ionic’s default values will override your defaults.
My Recommended Way Using Imports
My preferred method imports in a separate scss file called _variables.scss in my antstagram folder. This is done before anything from Ionic is imported. Then the rest of my custom styles are imported inside my main Antstagram styles after Ionic. This is so they can override Ionic’s styles.
@import "antstagram/variables";

// The path for our ionicons font files, relative to the built CSS in www/css
$ionicons-font-path: "../lib/ionic/fonts" !default;

// Include all of Ionic
@import "www/lib/ionic/scss/ionic";

// Include Antstagram styles
@import "antstagram/antstagram; // imports everything other than variables
Overriding color variables in Ionic 2
In Ionic 2, overriding color variables is pretty straight forward. It is done by editing the variables declared in the src/theme/variables.scss file.
I’m Missing Some Ionic Icon Fonts!
If you head to the Ionicons website and start using these icons, you may find that there are some missing in your project. Chances are this is because Ionic didn’t install with the latest Ionicons set. Head to the Ionicons website, click that download button and get the latest version.
Then, we can replace the Ionicons font files in www/lib/ionic/fonts. Replace them with the fonts in the fonts folder of the download. It’s simple and upgrades it to the latest version.
We also replace the scss files in www/lib/ionic/scss/ionicons with the ones in the scss folder of the download. There does appear to be an extra scss file in here for animations – leave that as is and just replace the others.
You might have noticed something contradictory here. Those files are within the www/lib/ionic folder and could be changed if we upgrade Ionic right? In my opinion, this is okay in this case. We’re temporarily bringing Ionicons to the latest version while we wait for Ionic to catch up. There’s the possibility you’ll lose icons if Ionic doesn’t upgrade as quickly. But, usually, the next upgrade of Ionic will also include the latest version of Ionicons. It also leaves it open for future upgrades to Ionicons to arrive automatically in updates of Ionic.
Once you’ve updated your font files, you should be able to use the icon you couldn’t see before. Click q in your terminal to stop running ionic serve and then rerun ionic serve to get the latest icons.
Missing Fonts in Ionic 2
To get the latest icon set on Ionic 2, check your package.json. Ionic manages ionicons this way for new releases of Ionic. Just run npm install and you’ll have the icons all setup for you. Just keep an eye on on the new Ionicon Docs as some names have changed.
Setting up Icons That’ll Display Differently between iOS and Android in Ionic 1
Ionic has several useful functions which you can use within your code to detect which icon to use. These include ionic.Platform.isIOS(), ionic.Platform.isAndroid() and ionic.Platform.isWindowsPhone(). An example of this is:
var icon;

if (ionic.Platform.isIOS()) {
  icon = 'ion-ios-arrow-back';
} else if (ionic.Platform.isAndroid()) {
  icon = 'ion-android-arrow-back';
} else {
  icon = 'ion-android-arrow-back';
}
In practice, I prefer to do a simpler check. If it is iOS, use the iOS icon, otherwise, use Android. This won’t work as neatly if you want to specify ionic.Platform.isWindowsPhone(). So far, Ionicons have no Windows Phone specific icons so I use Android icons by default:
var icon = ionic.Platform.isIOS() ? 'ion-ios-arrow-back' : 'ion-android-arrow-back';
When this is in objects I’ll be using regularly, I turn the object into a directive which contains this logic. For example, a custom back button (replace starter with the global app name you use for your modules):
angular.module('starter.directives', [])
   .directive('backbutton', [function () {
      return {
        restrict: 'E',
        replace: true,
        scope: false,
        template: '<button class="button icon button-clear"></button>',

        compile: function (element, attrs) {
           var icon = ionic.Platform.isIOS() ? 'ion-ios-arrow-back' : 'ion-android-arrow-back';
           angular.element(element[0]).addClass(icon);
        }
      };
   }])
This creates an element of
<backbutton ng-click="goBack()"></backbutton>
that I can reuse across the app and keep up to date with any changes in one central location.
Note: There is a back button element in Ionic, but I like to create my own simpler version for some situations like custom modal windows. The example works as well for other buttons and icons you’ll want to use too
Icons That’ll Display Differently in Ionic 2
New releases of Ionic have this functionality built into the framework. The ion-icon component will dynamically load the correct icon depened on the platform.
<!-- Will load the correct icon for ios and android -->
<ion-icon name="beer"></ion-icon>
You can still have a bit more control over what icon used by specifying the platform versions.
<ion-icon ios="ios-beer" md="md-beer"></ion-icon>
Keeping Custom Header Elements in Line on iOS
One thing you’ll soon notice if you add a custom element into the header, like my custom search box:

Is that on iOS, your element will be stuck behind the time and signal strength:

Ionic has specific classes to deal with this – platform-ios and platform-cordova. Ionic’s pre-built elements target those classes. They add in 20px top margin to the buttons in your header to make up for these situations. To get my own custom elements to do the same, I follow the same pattern. For my .search-bar, I add a margin if we’ve got a .platform-ios.platform-cordova:not(.fullscreen) body class:
.platform-ios.platform-cordova:not(.fullscreen) .search-bar {
  margin-top: 20px;
}
This fix brings my search box back in line:

Conclusion
Ionic has grown into a robust framework with a rich ecosystem of services. Hopefully the tips I’ve shared help those looking to embark on an Ionic journey of their own!
If you’ve got any tips of your own to share or alternative ways to do the above ideas, leave your thoughts in the comments.
References
Ionic documentation. Ionicons website Angular Cheatsheet. Styling Ionic 2 apps. A Guide to Styling an Ionic 2 Application.
If you enjoyed this, you might like to know that we have some great mobile content over on SitePoint Premium
Frequently Asked Questions on Ionic App Development
What are some best practices for optimizing Ionic app performance?
Ionic app performance can be optimized in several ways. Firstly, it’s important to minimize the use of watchers as they can slow down the app. Secondly, use one-time binding where possible to reduce the load on the digest cycle. Thirdly, use native scrolling instead of JavaScript scrolling for smoother performance. Lastly, consider using lazy loading to load only the necessary components, reducing the initial load time.
How can I customize the theme of my Ionic app?
Ionic provides a powerful theming system that allows you to customize your app’s appearance. You can use CSS variables to change the colors, fonts, and other design elements. Additionally, Ionic provides a set of predefined themes that you can use as a starting point for your customization.
What are the benefits of using Ionic for app development?
Ionic offers several benefits for app development. It allows you to use a single codebase to create apps for multiple platforms, saving time and resources. It also provides a rich library of pre-designed components, making it easier to build complex user interfaces. Furthermore, Ionic integrates seamlessly with Angular, allowing you to leverage the power of this popular framework.
How can I use CSS variables in Ionic?
CSS variables, also known as CSS custom properties, can be used in Ionic to customize the appearance of your app. You can define a CSS variable in your theme file and then use it in your component styles. This allows you to change the value of the variable in one place and have it updated throughout your app.
What is the role of the platform module in Ionic?
The platform module in Ionic provides information about the current platform the app is running on. This can be used to adjust the app’s behavior based on the platform. For example, you can use the platform module to check if the app is running on a mobile device or a desktop browser and adjust the layout accordingly.
How can I use advanced theming techniques in Ionic?
Ionic provides several advanced theming techniques that you can use to create a unique look and feel for your app. These include using CSS4 variables, creating custom themes, and using the color generator tool to create a color palette. You can also use the shadow parts feature to style the inner parts of a component.
What resources are available for learning Ionic?
There are many resources available for learning Ionic. The official Ionic website provides comprehensive documentation, tutorials, and guides. There are also online courses available on platforms like Ionic Academy. Additionally, there are many books, blogs, and forums where you can find helpful information and advice.
How can I debug my Ionic app?
Debugging an Ionic app can be done using various tools. For example, you can use the browser’s developer tools to inspect the HTML, CSS, and JavaScript code. You can also use the Ionic DevApp for live testing and debugging on a device. Additionally, Ionic provides a command-line interface that includes several debugging commands.
How can I test my Ionic app?
Testing an Ionic app can be done using various tools and techniques. Unit testing can be done using tools like Jasmine and Karma. For end-to-end testing, you can use Protractor. Additionally, you can use the Ionic DevApp for live testing on a device.
How can I deploy my Ionic app?
Deploying an Ionic app can be done in several ways. You can use the Ionic CLI to build your app for production. You can also use the Ionic Appflow service for continuous integration and delivery. Additionally, you can deploy your app to various app stores like Google Play and the App Store.
 Charles Muzonzini
Charles Muzonzini is a Mobile App Developer specializing in cross-platform development using the Ionic Framework. He runs a Digital Agency, webgems and he writes mobile app development tutorials at Sitepoint.com and his developer blog, Muzonzini on Mobile. He is also the co-organizer of the Harare WordPress Meetup.
 Patrick Catanzariti
PatCat is the founder of Dev Diner, a site that explores developing for emerging tech such as virtual and augmented reality, the Internet of Things, artificial intelligence and wearables. He is a SitePoint contributing editor for emerging tech, an instructor at SitePoint Premium and O'Reilly, a Meta Pioneer and freelance developer who loves every opportunity to tinker with something new in a tech demo.