The Chromecast with Google TV is one of our favorite gadgets for getting audio and video content up on an HDMI-equipped big screen, but its capabilities can be extended even further with the right accessory—specifically, a USB-C hub.
As long as you buy a hub that can pass power through to the Chromecast with Google TV, you’ve instantly got a lot more ports to play around with. From what we’ve seen from other people who’ve experimented with this, you need at least a 45W charger, which is what we used for our testing.
Some of these tweaks require access to the Developer options menu under System in Settings. To enable this, go to Settings and pick System, then About, and then select Android TV OS build seven times (you’ll see a message when you’ve done it correctly). This reveals several low-level device options that you wouldn’t otherwise be able to get to.
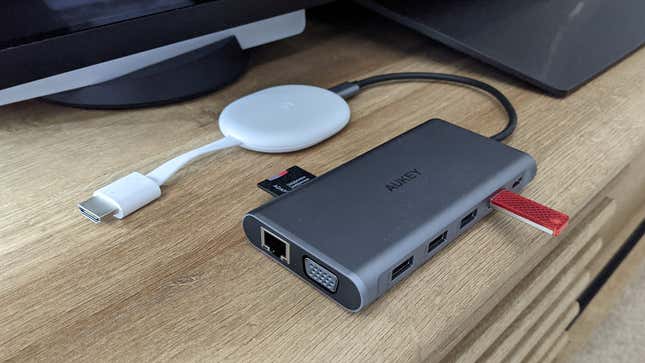
The hardware setup
As long as you’ve got a USB-C hub with power delivery that can be passed through to the Chromecast, and an upgraded power adapter that supplies enough wattage, the tests we’ve outlined here should work as advertised. For reference, this Aukey hub was the one we picked up for the job.
The more devices you connect to the hub, the more power you’re going to need. Some trial and error might be involved—with functionality like this that’s only supported semi-officially, everything might not work perfectly first time around.
Playing local video
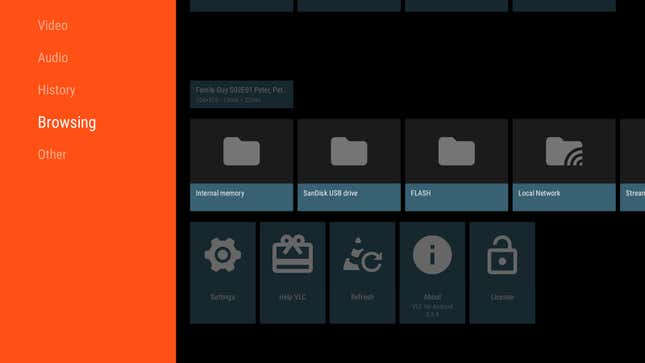
Once you’ve plugged in the USB-C hub and your Chromecast with Google TV, you can also attach a USB drive, as long as it’s formatted as FAT32 (which you can do in Windows or macOS). The storage should automatically be viewable and accessible to any apps on your Chromecast that can browse for files.
Install an app such as the VLC media player, and you can then open up images, audio and video from your USB drive. Any file management tool you install will be able to see the external storage, too, and you can launch files that way as well.
Attaching peripherals
Another way you can use a USB-C hub plugged into your Chromecast with Google TV is to attach a keyboard and a mouse. It makes entering text much easier, and allows you to better control apps that you’ve sideloaded that weren’t meant for the device (like a web browser, for example).
There’s not much to the setup here, as once you connect a keyboard and mouse to the hub they should be recognized and work immediately. You might find some bugginess in certain apps, but based on our testing, you should be able to type and click away as much as you like.

Making video calls
Google Duo shows up as an available app when you search for it on the Chromecast with Google TV, so once it’s installed all that you’re missing is a webcam. Slot a webcam into a spare port on your USB-C hub and you’ll be up and running—as long as you’re using a power brick with enough wattage to keep everything switched on.
Duo should automatically recognize your webcam, so you can put through your audio and video calls as needed (note the Duo app needs to be open on your Chromecast for incoming calls to appear). You can make audio-only calls without a webcam, too, using the microphone in the Chromecast remote.
Expanding storage
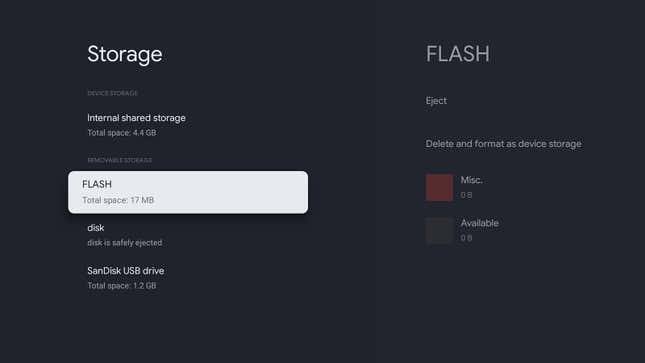
We’ve managed playing files off of attached USB drives, and those USB drives can also be used for the Chromecast to save apps and other files, if needed. Again, attached drives will need to be formatted as FAT32 for the Chromecast dongle to recognize them, which can be done from either Windows or macOS.
With your drive attached, open Settings and pick System, Developer options, and Force allow apps on external. Next, go to System, then Storage, and pick your USB drive. Select Erase & format as device storage and the Chromecast will subsequently be able to use it (this means you won’t be able to play local files from it anymore, however).
You’ll be invited to move data and apps over right away, but you can also do it later. From Settings, choose Apps, then See all apps, and pick the app you want to move. Select the app to get to its options, and select Storage used to move it.
Boosting internet speeds
Some users have bemoaned the lack of an Ethernet adapter for the Chromecast with Google TV—adapters are available for previous Chromecast models—but this is another problem that adding a USB-C hub can fix. If you buy a hub that includes an Ethernet port, you can connect it straight to your router.
That means an internet connection that should be faster and more stable—perhaps significantly so, depending on the state of your wifi, and that will make a difference when watching movies, gaming, and so on. The wired connection should be recognized by the Chromecast automatically, once everything is plugged in, but you can check by going to Network & Internet in Settings.
(Updated 3/4/22 with new details)