In the last several years, the dark and moody style of food photography has become a trend that is still going strong. While most people know what “dark and moody photography” means, there’s another, lesser-known term for this approach: “Chiaroscuro”.
Let’s take a look at what this term means and use this concept to learn how to shoot dark food photography.
What isChiaroscuro?
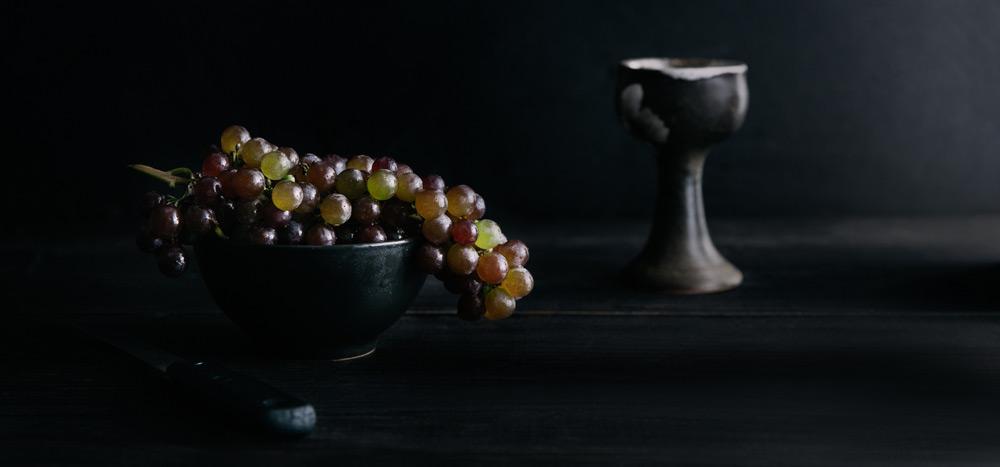
Chiaroscuro is an Italian word — a term borrowed from the art world.Chiaroscuro is a technique that originated in drawing during the Renaissance and has continued throughout the centuries in other art media. This technique emphasizes strong contrasts between shadow and light in an image, with the light falling off unevenly, or from a particular direction. Think of the paintings of Caravaggio, or the Dutch Masters, Rembrandt and Vermeer.
InChiaroscuro, the photographer cloaks parts of the image in shadow and gently leads the viewer’s eye to the brightest part of the frame. In food photography, this is where you place your subject, although you may place some parts of the subject in shadow as well.
Thechiaroscuro technique is so captivating because it gives two-dimensional objects a sense of volume. One way you can achieve it in photography is through the use of Rembrandt lighting.
To effectively pull off this style in your images, you need to make sure that you carve and shape the light coming in from a single light source. Fill cards, diffusion, and bounce all play a central role in your set-up, as do your choices in backdrops and props.
The lighting has to be soft enough to bring dimensionality to the subject, and the transitions between the light and shadow areas should be smooth and gradual.

Lighting Chiaroscuro Food Photography in Natural Light
Shooting images in the dark and moody style is a challenge with natural light. It’s easier with artificial light because it’s easier to control.
When photographing in thechiaroscuro style, you wantonly one light source. If you’re shooting in a room with several windows, you need to block them all off except one.
In most cases, you won’t be using any fill light. If you have any light bleeding onto your set, you can simply block it with a piece of black card, like a piece of foam core, and anA-clamp attached to alight stand.
In general, side lighting will give you a stronger contrast between shadow and highlight areas in your images and will create a dramatic mood. Block off areas where you don’t want a light hitting your set withblack reflectors or cards in different sizes. Take the time to experiment and observe the light on your set and see what works in terms of positioning your cards.
When shooting with natural light, experiment with moving the set away from the window.When you move farther away from a light source, you reduce its power and how quickly it falls off.
Also, try angling your set in relation to the window instead of placing it perpendicular to it. This side backlighting technique will add dimension to your lighting and bring out the texture of food.
Lighting Chiaroscuro Food Photography with Strobe
When lighting forchiaroscuro food photos, you don’t need as much light on your set as you do for bright and airy images. However, youdo needto shape that light.
I recommend shooting withone monolight, fitted witha dish reflector and a honeycomb grid, rather than using a softbox as your modifier because it will give you better contrast. While softboxes are great for food photography in general, one problem is the strength of the light they emit.
If you placea softbox close to your set, you get softer light yet shadows that can fall flat. If you move it back, those shadows become more defined, yet highlights become more specular and the light becomes harder. It’s a tough balancing act.
By usinga reflector with a honeycomb gridand placing it about six feet/one meter away from a large scrim or diffuser, you mimic natural light coming in from a window. The coverage of light on the diffuser grows as you move the light back.

This lighting set-up will give you a similar effect to bouncing light off a white wall and it requires a lot less power. You’ll find that it works really well for dark and moody food photography. You’ll get bright highlights and soft shadows.
However, this doesn’t mean other modifiers won’t work well.The important thing is that you shape the light as needed with pieces of black foam core. You can also use a black fill card over your set to block light if you find that you’re getting fill light from any light hitting the ceiling.
One great light shaping technique is to create a tunnel of light hitting your set. Position yourblack cards in a way that allows for light to pass between them and hit your subject, as in the image below. This will create a dark and dramatic mood in your images and give the sense that light is coming in from a window.

Setting Exposure in Chiaroscuro
The most important thing to remember about shooting food in thechiaroscuro style is thatyou must not make the mistake of severely underexposing your imagein attempts to make it “dark and moody”. Or take a regular shot and try to make it dark in Photoshop.
In either of those scenarios, you’ll end up with a dark, muddy-looking image that fails in its intent. The point ofchiaroscuro photography is to explore the relationship between shadow and light. An underexposed image is dark overall, and has little contrast between light and shadow areas.
Chiaroscuro can have a very bright treatment of food with very deep shadows, as seen in the images here, or the image can be low key with not a lot of contrast. In this case, just be sure you don’t blow out your highlights and the shadows are not too black with no detail.
Whichever approach you take, the focus should be on the main subject, and the image needs to be exposed for the concept, mood, and story.
Choosing Props and Backdrops in Dark Food Photography
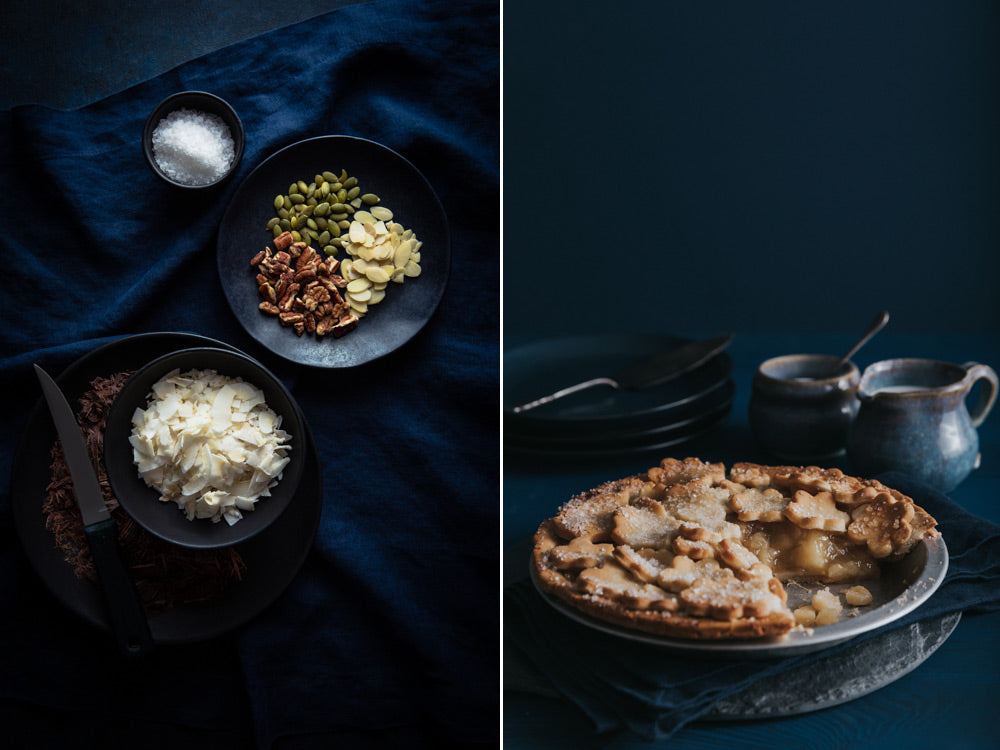
It’s crucial that you usedark backdrops and props inchiaroscuro food photography. White or brightly colored props will detract the viewer’s attention from the subject. Light dishes create a stark contrast and can be difficult to expose correctly. Dark colors also absorb the light and add shadows.
Choose dark, matte dishes in a muted, neutral tone. The reflections on shiny dishes can be difficult to manage. Vintage utensils and props with a patina can add interest to a food story and also won’t reflect as much light as new items do.
Idealcolors for backdrops are dark grey, black, deep espresso tones, and dark blues. Slate boards make a stunning background layer, as do old and mottled cookie sheets and porcelain tile.
Wood is also a great material, as long as it’s not too orange in tint. Orange gets exaggerated by the camera and tends to compete with food, which is usually warm in color. Cool tones will complement most food subjects and give a crisp, fresh feeling.
Lightly coloredbackdrops will reflect the light, which will result in softer shadows — which is not what you want.

Using a Workflow for Dark and Moody Food Photography
The key to working effectively when photographing food is to have everything set up to shoot when the food is ready to go, and then working quickly before the food dies.
You can use this as a general workflow:
- Use a stand-in similar in color and tone to your main dish while you set up and test your lighting. It can take some time to achieve the look you want, and the food should be very fresh at the time of capture. Depending on your food subject, you might want to make extra and then just swap out the plate when you’re ready to hit the shutter.
- Place your subject in the focal area of your frame and then add your props and supporting elements one at a time. Get down to the level of your camera lens and assess how each item is working with the subject. Don’t overuse props. Each prop should have a purpose and work cohesively with the overall food story.
- Make sure that your light is coming in from one direction and that you block off any unwanted light that is bleeding onto your set. Try side lighting or side backlighting for more directionality. Usea large diffuser to prevent unwanted light from spilling onto your set. If you’re not getting the light or exposure you want, play around with the distance of your light from your set, keeping in mind the “inverse square law”.
- Choose the appropriate lensand f-stop for the shot. F/5.6 is a good default for food photography. Shooting food at a wider aperture than this can result in too shallow of a depth-of-field, which means that too much of your subject will be out of focus. In general, you want to focus on the front of the food or dish.
- Usea tripod to create consistency in your light and composition from image to image. Mark the floor by your tripod legs with gaff tape so you know where the tripod was sitting in case it gets bumped.
- Utilize post-processing in a way that further shapes the light and brings out the best qualities of the food subject.

Retouching Dark and Moody Food Photography
Although you should strive to get things as correct as possible in-camera, part of shaping light happens in post. Retouching is where you’ll get the most out of your chiaroscuro images.
One trick is to slightly desaturate the image and then work on bringing out the colors individually with local adjustments. The key is to make the food — the hero of the shot — the star of the show and make it look its very best.
If you’re using Lightroom or Camera RAW,use the Luminance sliders to brighten colors individually, rather than using the saturation sliders, which demand a very subtle hand and can quickly look clownish.
Since you won’t be using white dishes and props, you can approach white balance and tint creatively instead of striving for “correct” color. Split-toning — especially dark blue in the shadows — can also add richness to a dark and moody photograph. Again, subtlety is the key, so a saturation maximum of +10 should suffice.
Generally, a balance of warm and cool tones will give your image a three-dimensional feel.
Finally, adding a bit of a soft vignette to deepen the shadows and draw the eye to the food almost always works well.
Conclusion
If you’re used to shooting images that are subtle, with low contrast, or images that are bright and airy,chiaroscuro food photography may seem a bit daunting.
However, if you’re shooting for clients or want to attract some, you need to demonstrate versatility by having a portfolio containing a variety of lighting styles. Dark and moody food photography will show your range and be attractive to a wide variety of clients.
Whilechiaroscuro food photography is a bit challenging, it can result in images with a stunning, painterly quality that evokes emotion and stirs the senses. Isn’t that what food photography is all about?


